|
A new customizable ribbon will let Outlook for Mac and Windows users control which buttons are available, so you can tailor the email interface to your own common tasks. 
Add Bullets and Numbering in OneNote: Overview You can add bullets and numbering in OneNote to automatically apply simple bullets and numbering to the lists as you type. You can also type a list, select it, and then apply bullets or numbering afterward. It is also possible to change the appearance of the bullets and numbers you use. One way to add bullets and numbering in OneNote is to apply them as you type. You can start a bulleted list in OneNote by typing an asterisk (*) at the beginning of the first item in your list. Then press the “Spacebar” key. When you press the “Spacebar” on your keyboard, the asterisk turns into a bullet point. Then type the first line of the list. When you press the “Enter” key to move to the next line, it continues the bulleted list. To discontinue the bulleting, press the “Enter” key again when finished with the list. You can also add bullets and numbering in OneNote to create a numbered list as you type. To do this, type an Arabic or Roman numeral, followed by either a period, dash, or parenthesis. Then press the “Spacebar” key to add a space. As with the bulleting, when you press the “Spacebar” key, the list is automatically converted into a numbered list. When you press the “Enter” key to move to the next line, the numbering continues. As with the automatic bulleting, you can press the “Enter” key on your keyboard again to finish the numbered list. Add Bullets and Numbering in OneNote – Instructions: A picture of a user numbering a list as they type in OneNote. Another common way to add bullets and numbering in OneNote is to start by typing your list, first. Then click and drag over the line items in the list to select the text you want to make a bulleted or numbered list. Next, click the “Home” tab in the Ribbon and look in the “Basic Text” button group. 
Here, you can click either the “Bullets” or “Numbering” buttons to apply the last styles used. You can also click the drop-down arrows next to either button. Then select the desired format of bullets or numbering to apply from the drop-down menu of choices. One advantage of using numbering in OneNote is that you don’t have to manually number your lists. Also, if you make a change such as deleting a line, OneNote automatically corrects the list numbering. Add Bullets and Numbering in OneNote: Instructions • To create a bulleted list as you type, type an asterisk (*) at the beginning of the first item in a list. • Then press the “Spacebar” key on the keyboard. • After pressing the “Spacebar” key on the keyboard, the asterisk turns into a bullet point. • To continue the bulleted list, type the first line of a list. • Then press the “Enter” key to move to the next line. • To discontinue the bulleting, press the “Enter” key again, when finished. • To create a numbered list as you type, type an Arabic or Roman numeral followed by either a period, dash, or parenthesis. • Then press the “Spacebar” key on the keyboard to create a space. • After pressing the “Spacebar” key, the list is automatically converted into a numbered list. • To continue the numbered list, type the first line of the list. • Then press the “Enter” key to move to the next line. • To discontinue the numbering, press the “Enter” key again, when finished. • To add bullets and numbering in OneNote to an existing list, type the list, first. • Click and drag over the line items in the list to select the text to turn into a bulleted or numbered list. • Click the “Home” tab in the Ribbon and then look in the “Basic Text” button group. • Then click either the “Bullets” or “Numbering” buttons to apply the last styles used. N64 emulator mac os. • Alternatively, click the drop-down arrows next to either button. • Then select the desired format of bullets or numbering to apply from the drop-down menu of choices. Add Bullets and Numbering in OneNote: Video Lesson The following video lesson, titled “,” shows how to add bullets and numbering in OneNote. This video lesson on how to add bullets and numbering in OneNote is from our complete OneNote training, titled “.”.
0 Comments
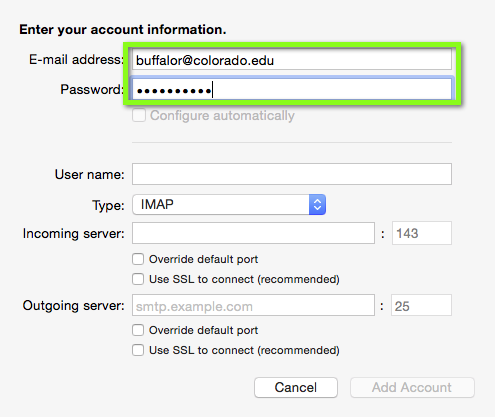
I have the ESP32 board with Silicon Labs CP2102 controller. When I connect it to my MacBook, I can get the details about this device using the command system_profiler SPUSBDataType, but it is not listed in /dev as a virtual serial port - so I can't communicate with it. CP2102 USB to UART Bridge Controller: Product ID: 0xea60 Vendor ID: 0x10c4 (Silicon Laboratories, Inc.) Version: 1.00 Serial Number: 0001 Speed: Up to 12 Mb/sec Manufacturer: Silicon Labs Location ID: 0x14200000 / 5 Current Available (mA): 500 Current Required (mA): 100 Extra Operating Current (mA): 0 I'm using the official driver downloaded from. Any ideas how to make it visible in /dev? I have also Windows installed on the same computer where it works fine, so the HW and the USB cable are OK. Apple has an official technical note called 'Technical Note TN2459: User Approved Kernel Extension Loading' which describes this new process that Apple added in MacOS X High Sierra. Configuring Gmail on Outlook for MAC Note: If this is the first time you are setting up email in your MAC, you’ll initially be prompted to select an email provider, be it Exchange, ICloud, Yahoo or GMail. On build number 0902 and higher you can sync contacts and calendar with Outlook for Mac 2016 but first you need to add the account to Outlook. See Add an email account to Outlook for instructions. 
The Mac OS X driver supplied by Silicon Labs is not very stable; it has caused my Mac to crash several times already. Uninstalling this driver is not as easy as uninstalling other applications on Mac; normally, you just drag the app into the trash – done. However, these drivers are supplied in “pkg” (package) format. Question Where can I find Mac OS X drivers for the CP210x USB-to-UART bridge devices? Answer The latest available Mac OS X Virtual COM Port (VCP) driver can be downloaded from here. It applies to any third party kernel extension. All kernel extensions for MacOS X must be signed using a special key from Apple and then must be approved by the user. There is currently no extra level of certification available to third parties to allow Kernel Extensions to load bypassing this step. This is not a problem specific to this driver or specific to Silicon Labs. Its not a 'bug'. – Nov 7 '17 at 19:21. I mounted a CP2102 I got from AliExpress on one of my boards. How do you get google calendar to download to mail for mac. When I connected it to my machine, it was recognized as some random USB device I was able to find on Google (forgot what it was, but the web site had no indication that it used some serial USB connection). I actually had to download the firmware off of an off-the-shelf CP2102 adapter and flash it onto this one to get it to work. Then it was fine, though. I guess those were overstock components from a production line and that's the reason they were so cheap. 
Grasshopper plugin for programming ABB, KUKA and UR robots for custom applications. Special care is taken to have feature parity between all manufacturers and have them behave as similar as possible. This video will show you how to install and try grasshopper on the rhinoceros wip version. This is just a trial version. I have no relation with rhinoceros o. 
The plugin can also be used as a.NET library to create robot programs through scripting inside Rhino (using Python, C# or VB.NET). Advanced functionality is only exposed through scripting. Navigate this page: • • • • • • • Download • Get the robots.gha file from the. • Get one or more (they work with the Bartlett robot library). Prerequisites • Windows 7 or above •.NET Framework 4.0 • Rhinoceros 3D 5 SR13 64 bit • Grasshopper 0.9.0076 Installation • Download the robots.gha and robots.dll files from the. • Open the folder that contains the downloaded files, right click on them individually, select properties and click on Unblock. • Place the files on the Grasshopper components folder. You can find this folder through the Grasshopper menu by clicking on File, Special Folders, Components Folder. • In your Windows Documents folder, create a subfolder named Robots and place the XML and 3DM files that correspond to one ore more. • Open Rhino, run the Rhino command GrasshopperDeveloperSettings and disable 'Memory load *.GHA assemblies using COFF byte arrays'. • Restart Rhino and open Grasshopper. There should be a new tab in Grasshopper named Robots. Adding a custom robot Visit the section for instructions on how to add your own robot cells. Coordinate systems As with Rhino, the plugin uses a right-handed coordinate system. The main coordinate systems are: • World coordinate system: It's the Rhino document's coordinate system. Cartesian robot targets are defined in this system. They're transformed to the robot coordinate system during post-processing. • Robot coordinate system: Used to position the robot in reference to the world coordinate system. By default robots are place in the world XY plane. The X axis points away from the front of the robot, the Z axis points vertically. • Tool coordinate system: Used to define the position and orientation of the TCP relative to the flange. The Z axis points away from the flange (normal to the flange), the X axis points downwards. Units The plugin always uses the same units irrespective of the robot type or document settings. • Length: Millimeters • Angle: Radians • Weight: Kilograms • Time: Seconds • Linear speed: Millimeters per second • Angular speed: Radians per second Uploading the program to a robot Most robot controllers from ABB, KUKA and UR support uploading a program through a USB port. Use the 'Save program' component to create a file of the program and copy it to a USB drive. Use this method if your controller doesn't have network support. The fastest way is upload the program through a network connection. If you use a LAN cable to connect directly your PC to a KUKA or UR controller, you'll need to know the IP of the controller and assign an IP manually to your PC in your network adapter settings. ABB controllers (IRC5) include a DHCP server, so you don't need to set an IP address. If you use a router with DHCP server to connect to KUKA or UR controllers you can set both the IP of your PC and controller to automatic. The following is the currently preferred upload method for each robot manufacturer (more integration of the upload process within Grasshopper is planned): KUKA • KUKA controllers run on top of Windows. Create a shared folder in the controller as you would in a Windows PC. You'll need to know the a username and password to access the shared folders (the default username and password depend on the controller version). • In Grasshopper, use the 'Save program' component and set the folder path to point to the shared folder. • Use the pendant to copy the program from the shared folder to the program folder to be able to select it. UR • If the program is not very long, use the 'Remote UR' component to establish an TCP connection to the controller. You can then stream the program to the controller directly from Grasshopper. • If the program is long, or you want to upload multiple files, you can use an FTP client (that supports a secure connection) to upload the program. However, every company has their set of rules, which includes registration and take a lot of time to set up. Betternet is an easy to understand and navigate, and the user-interface enables the non-technical people to use it efficiently. • You can access any blocked or banned website from your location. 
||||||||||| Please direct any questions or bugs regarding software to the company that developed the program. Rocket Download is not responsible for any problems that may occur from downloading or installing software that listed here. We are merely a software download directory and search engine of shareware, freeware programs available on the Internet. However report a problem you have had with any individual software listed here and we will delete it promptly. Note: Remember to virus scan all software before you install, and be sure to read and agree the software License Agreement. Download and install Horse Haven World Adventures in PC and you can install Horse Haven World Adventures 115.0.0.9.100 in your Windows PC and Mac OS. Horse Haven World Adventures is developed by Ubisoft Entertainment and listed under Casual. If you are looking to install Horse Haven World Adventures in PC then read the rest of the article where you will find 2 ways to install Horse Haven World Adventures in PC using BlueStacks and Nox app player however you can also use any one of the following alternatives of BlueStacks. Download and Install Horse Haven World Adventures in PC (Windows and Mac OS)Following are the 2 metshods to install Facebook Lite in PC: • Install Horse Haven World Adventures in PC using BlueStacks App Player • Install Horse Haven World Adventures in PC using Nox App Player 1. Install Horse Haven World Adventures in PC using BlueStacks BlueStacks is an Android App Player that allows you to run Android apps on PC. Following are the steps on how to install any app on PC with Bluestacks: • To begin, • Launch BlueStacks on PC • Once BlueStacks is launched, click My Apps button in the emulator • Search for: Horse Haven World Adventures • You will see search result for Horse Haven World Adventures app just install it • Login to your Google account to download apps from Google Play on Bluestacks • After login, installation process will start for Horse Haven World Adventures depending on your internet connection. The addition of Ubisoft titles further broadens the Mac games market and provides further evidence that TransGaming is the partner of choice for Mac enablement.' 'Ubisoft is extremely excited. This is a list of video games published by Ubisoft. This is a dynamic list and may never be able to satisfy particular standards for completeness. You can help. Hints: If you are having LOADING issue with BlueStacks software simply install the Microsoft.net Framework software in your PC. Or comment below your problem. Hint: You can also Download Horse Haven World Adventures APK file and install it on Bluestacks Android emulator if you want to. You can download Horse Haven World Adventures APK downloadable file in your PC to install it on your PC Android emulator later. Horse Haven World Adventures APK file details: Best Android Emulators Bluestacks & Nox App Player Operating Systems Windows 7,8/10 or Mac App Developer Ubisoft Entertainment App Updated November 19, 2018 APK Version 6.0.0 Category Android Version Required for emulator Android 4.1, 4.1.1 APK File Size 34.9MB File Name com.ubisoft.horsehaven.adventures_6.6.0_75204.apk 2. Trying to find correct drivers for video and audio in Drivers and Hardware I upgraded an older HP Pavilion dv6910us laptop from Windows 8.1 to Windows 10 yesterday and while the upgrade went smoothly, after I logged in I found that the video was using a driver of Microsoft Basic Display Adapter and the sound was using. How set up Oracle's VirtualBox on a Mac, then use it to set up a virtual machine running Windows 10. Virtualbox video drivers windows 10. Correct video drivers for Windows 10 in VirtualBox? I have Windows 10 running in VirtualBox (Windows 7 Pro is the host OS). I can't choose a resolution to match my display which is 1920 x 1080. This means you need to install the Windows 10 VirtualBox guest additions. Click Devices menu > Install Guest Additions. Inside the Virtual Machine click Start > File Explorer > This PC launch the VirtualBox additions icon then click Next to begin the installation. The appropriate template is available in Windows and Linux versions of the VirtualBox software: However, after you install VirtualBox Guest Additions, the video driver does not work. That's because this Windows 10 machine template has video acceleration disabled, so the driver can't be installed and the virtual video device cannot be recognized. You just need to change it. Turn off your Windows 10 VM. Sharp mx 3115n Driver updates latest version printer driver and gets good performance of best quality print document. Here you can download support OS. Setting up gmail in outlook for mac. Sharp mx 3115n Driver download for Windows 7, Windows 8, 8.1, Windows 10 OS 32-bit / 64-Bit, Mac, Linux, Ubuntu Operating system support. Many printers and scanners use driverless technologies such as AirPrint or IPP Everywhere, which don't require additional drivers on your Mac. But third-party drivers might still be available for older devices that do require a driver. Always before connecting the device to your Mac for the first time. If the appropriate driver is available from Apple, your Mac will install it automatically. This list is no longer updated. Many vendors of printers and scanners have adopted driverless technologies such as AirPrint, and they are no longer providing drivers for new devices. If your printer was made in the last several years, it probably doesn't require a driver. This list is provided for reference purposes and is no longer being updated. You can manually set tab stops to control the horizontal alignment of your text. Align center for word mac. First you need to be be familiar with the different tab stop symbols: Symbol Tab Stop Type Left - Aligns all text with the leftmost part located at the tab stop. Notice how in each case, the line moved horizontally to the next 0.5' mark ('is' at 0.5', 'an' at 1.0', etc.). At the upper left of your document, next to the ruler, you should see this icon: By using that button and the ruler, you can automatically create tab stops wherever you like. Information about products not manufactured by Apple, or independent websites not controlled or tested by Apple, is provided without recommendation or endorsement. Apple assumes no responsibility with regard to the selection, performance, or use of third-party websites or products. Apple makes no representations regarding third-party website accuracy or reliability. Risks are inherent in the use of the Internet. For additional information. Other company and product names may be trademarks of their respective owners. Sharp MX-M465N Sharp MX-M465N PCL6 Driver & Software for Windows 10, 8, 7, Xp (64-bit/32-bit) and Manual Installation, Reviews- About Sharp MX-M465N - The Product from Sharp, a Multi-function Printer with serial number MX-M465N. This machine has the capability of printing, copying, scanning with 46 PPM. This product has its own advantages that with high speed to print a document only takes 3.9 seconds. The prints were very satisfied. High-resolution printing technology is very clear, sharp and very professional. Specifications for more details we have launched the data from the www.unitedbusinessgroup.co.uk page regarding the standard specifications of the Sharp MX-M465N edition are a Large 10.1 'high-resolution touchscreen with tilt view, the Action menus provide users with feature specific guidance. The Standard 256 bit data encryption and 7x overwrite protection. It has 1200 x 1200 dpi. It means also that this printer has a razor sharp monochrome documents printed. It is available 500 + 2,000-sheet Tandem Paper Drawer that fits within the standard footprint of the MFP. It has energy efficient belt fusing lowers power consumption, It has pinch tap, flick, slide and zoom capabilities of operating, It is also has the benefit to do scanning with both sides of documents sheets in up to 170 IPM and the standard 150- sheet of duplexing documents. It is compatible with the printing system of PCL 6 and Adobe PostScript 3 and also 10 Standard out-of-box wireless networking. Description: Explanation about Sharp MX-M465N and also the specifications and some advantages you can compare with another. How to Installations Sharp MX-M465N For Macintosh • Download the driver from link above. • Click “View File”. • Select the downloaded file. • Click the MacOSx folder. • Click the folder for your version. What version? • Click the installer package and follow instructions and next, • Enter the Name & Password. Click Install Software. • When the installation has completed screen appears, click close. How to Installations Sharp MX-M465N For Windows • Download the software from the link above. • Then extract the file and save the extracted files in any folder. • Click the →Start button, select →Settings & then click →Printers. • Double-click the →Add printer icon. • Follow the on-screen instructions. • After the installation completed & then test print. Sharp MX-M465N Driver Downloads for Windows, Mac, Linux. →MAC OS Driver Package Mac OS 10.10-10.13 Print Drivers →Windows 32 bit OS Driver PCL, PS, PPD, XPS, Universal Drivers →Windows 64 bit OS Driver PCL, PS, PPD, XPS, Universal Drivers →Windows Software Option PC-FAX, TWAIN, Sharp Status Monitor →Linux/Cups PPD Software Linux/Cups PPD →Windows OS Driver Package Software Universal Driver →Windows 32 Bit OS Driver Package PCL, PS, PPD Print Drivers →Windows 64 Bit OS Driver PCL, PS, PPD Print Drivers →Windows WHQL OS Software WHQL TWAIN Driver →Windows Software Option PC-FAX Driver. Facebook pages all look alike in terms of design, but on your own website, you can realize a brand image, offer products for sale, and integrate third-party web services. You’re browsing the web with Safari on your Mac. You come across a page that you want to save for future reference. How do you do this? Or, more to the point, what’s the best way to do this? The answer is not as obvious as you might think. The answer is (as it is so often in life): it depends. Without working up a sweat, I came up with a dozen different ways to save all or part of a webpage. Each one has its own pros and cons. To help figure out which one is best for your situation, here are your choices: 1. 
Create a tab or open a new window When to do it. Technically, you are not actually saving a page here. You’re merely keeping the page open in Safari. This works best when you don’t intend to keep the page around for any length of time. It’s just that you want to click a link to go to another website and wish to temporarily maintain easy access to the current page (without having to depend on the Back button). How to do it. Control-click on a link. From the menu that appears, select Open in New Tab or Open in New Window. Alternatively, select Safari’s New Window or New Tab commands, located in the File menu; this opens a new page from which you can enter a URL in the address bar. The main downside of this approach is that the page may get “lost” before you are done with it — if you have to quit Safari or if the program crashes. These days, however, such loss is easily avoided. If you have your Mac set to, the pages should return when you next launch Safari. Otherwise, I recommend the for saving the current state of your browser. As a last resort, you can use your History list to locate lost pages. A secondary downside is that Safari has a irritating tendency to periodically force a reload of currently open pages. If the page has any data that would be lost in a reload (such as entries to a form you are filling out), or if the page has been updated in the interim, the prior content will almost certainly be gone. In any case, don’t use this technique to excess. To my dismay, my wife often keeps a dozen or so windows open in Safari, each with 8 or 9 tabs. This begins to slow down Safari, eventually to a point where the program becomes unusable. Save the page as a bookmark When to do it. With this method, rather than saving the page itself, you’re saving its URL. Still, this is ideal if you expect to frequently return to a page and typically want to see its latest content (such as the home page here at TMO). How to do it. When the page is open, select Add Bookmark from the Bookmarks menu. Or select the same command from the Sharing menu (accessed from the “arrow in a rectangle” icon in the Toolbar). After doing so, you select the bookmark to return to the page. Save the URL as a “web internet location” file When to do it. As with a bookmark, you’re just saving the URL here. However, you’re saving it as a file in the Finder rather than as part of Safari. As such, you can launch the page at any time simply by double-clicking the file’s icon.  
Besides serving as a method of communication, emails can also be treated as formal proofs on discussions. In lieu of the significance it holds to professionalism one has to take utmost care of and being able to reply to the most important ones under all circumstances (even if ). Also, messages of high importance need to be tracked at times (from source to destination). This could ensure that a message has been delivered and/or been read by the right person. MS Outlook (desktop client) features an integrated tool to help you with this. Note: This works best when both the sender and receiver are using Outlook desktop client. Gmail users may try. Activating Receipt Requests on Outlook The simplest way to activate requests for delivery and read emails is to check the respective check boxes while creating a new email message. The choices are available under Options -> Tracking on the new email window. However, this would serve as a singleton request and you would have to repeat the activity for each required instance. For a permanent setting, follow the understated steps:- Step 1: Navigate to Outlook Tools and click on Options to bring up the setup wizard. Step 2: On the Options dialog switch the highlight to Preferences tab. Click on the button reading Email Options under the Email section. Step 3: The Email Options dialog will be launched next. Get adobe flash player for mac chrome. Under Message handling you will find Tracking Options. Hit this button. Step 4: As shown in the image below, tick Delivery receipt to receive confirmation on delivery of messages and tick Read receipt to receive confirmation that your message has been viewed. Step 5: Click on Ok. Finding and Installing Kodi Add-ons for Mac All of Kodi’s add-ons can be divided into two rough categories: official and unofficial. The former includes dozens of add-ons packaged into a single repository tested and approved by the Kodi development team. Yes, Kodi is safe for your system. That is if you got Kodi software from us or Kodi.tv website. We are the only ones that provide original and safe Kodi installer on the internet. How to install Kodi v17 Krypton on a Mac Kodi, the open source media player, is a hugely popular option for users across a variety of different mediums, enabling easy streaming of Internet content. Is kodi safe. The best Kodi add-ons for Mac in 2018 and how to stay safe. “To make the most out of your Kodi experience it’s a good idea to find the best add-ons for the type of content you’re. Installing Kodi to Turn Your Mac Into a Media Center By Phil South – Posted on Jun 8, 2015 Jun 7, 2015 in Mac As you may know, the classic multi-platform media center software called XBMC has undergone some revisions and is now called Kodi. Click on Ok for all the dialog boxes that got stacked from Step 2 to Step 4. With this setup you will have to manually navigate to Options -> Tracking on the new email window only in any special case. What Happens Next? I tried testing if the setup worked. I sent an email with the delivery receipt checked and this is what I received in response. I tried it again for read receipt and noticed that it was a conditional layer. The receiver must give his/her consent in order to send the read receipt to the sender of the message. With all the consent, I got a read receipt for my test message as shown in the image below. Conclusion This is something that you may not require in your day to day life. But definitely, it drags some attention in occasions where you want to ensure and track the progress of things. Do you think this gives you some more edge with your emails at work? Let us know in the comments section. Last updated on 8 Feb, 2018. Delivery receipts confirm that an email has been sent to the recipient's inbox, while a read receipt confirms that a message has been opened. Outlook for Mac users can also choose to decline to. Next time you get the message that includes a read receipt request, Outlook will not show any notification. There is another way to block read receipt requests. Go to FILE -> Options. Choose Mail from the Outlook Options menu and go down to the Tracking area. Select the 'Never send a read receipt' radio button. 
As far as the PlayStation X games are concerned, it has the game pool of some of the best video games of the past decade. The name of these PlayStation games includes Final fantasy, Tetris, Resident evil, Crash and Pepsi man. There are many other countless game titles that can get excited any PlayStation fan. Check also: Now let’s discuss about the Psx emulators for Android that would change your dream into reality playing of past PS games. Emulators for Psx numbers in dozens but we are not talking about any non sense PS emulator but the best Psx emulators. So, lets check out the names of some of the best PlayStation emulators out there. Matsu PSX Emulator Matsu is no ordinary but a multi emulator that cannot just run only PSx games but also of and PSP’s console games. Try It has fast forward and rewind feature that get you some skipping power over your game. Enjoy full to PlayStation Psx games with touch screen Ps controls and forget worrying about getting your game save every time you play it. The Matsu PSX Emulator has save state feature that allows you to play your game and resuming it with great ease. Psx4droid Psx4droid is another free Sony emulator for Android that allows you to enjoy the PS1 and PS2 games at the same time. Skip the frames with its fast forward option and enjoy the challenges you like most with its rewind feature. 
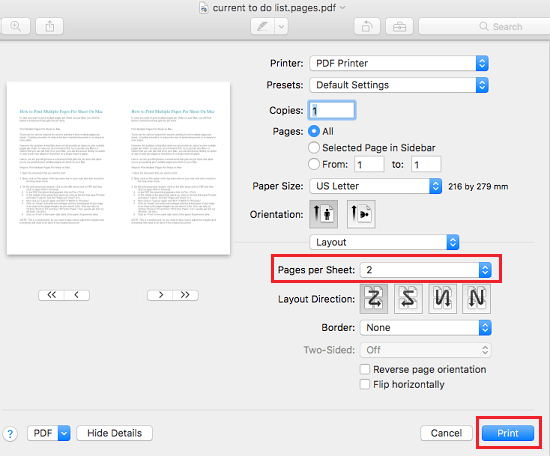
Although Matsu is also free but the competitive edge it has over Matsu, is its specialization for Psx console and Android platform. EPSXe EPSXefor Android although, is not free yet comes with so beneficial features that it worth paying for the emulator. Its specialization lies in its huge range of options for controllers. You can enjoy the game either via touch screen control, gaming pad or with any hardware controls. Whereas the cheat code feature adds in to the fun of playing Sony Psx games. And along with the controllers and cheat codes, it has some extra plugins that make ePSXe it stand out from its contenders. Attach your controllers or any other device using the Bluetooth option. Create a booklet using a template On the File menu, click New from Template. In the top right corner of the window, type booklet where you see Search All Templates. How to create a booklet in Word for Mac 2011 using mail merge?? For years I have been printing a small pocket-sized address book using Word for Windows, and data in an Excel worksheet, but for the life of me can't figure out how to do it in Word for Mac 2011. Also, I didn't mention this earlier because it's command line only (i.e. You have to use the Terminal), but Mupen64plus is currently the most advanced emulator and it has a Mac port that is continually updated. BEST PSX Emulator Pro For PSX for Android is a Playstation emulator (PSX and PSOne). Play PSX games on your Android device, at high definition with extra features! Our PSX Emulator Pro is the best, and only PSX emulator for Android. Check out FPse If it is sound quality and graphics you want of original Sony Psx console then no doubt, FPse should be the emulator you download. You can hardly tell the difference in the graphics of game you play on Sony Psx and FPse emulator. In addition to that, FPse best feature is its detection of local memory that tells the emulator, either PlayStation game is available in the phone or not. And if there is already a game of PSx in your phone’s memory, it will automatically attach it to the emulator and you will have no difficulty of playing it on your phone. Its simple user-friendly interface is the reason people of any age can download and play it on their phone. A QuickBooks Payroll Service is a subscription you activate to enable the payroll features in your QuickBooks Desktop Software. Depending on the features you need, you can choose from Basic, Enhanced or Assisted Payroll. QuickBooks Payroll service does not work with QuickBooks Mac. Mac users use Intuit Online Payroll as their payroll add-on. As a standalone software, Intuit Online Payroll only exports transactions to QuickBooks Desktop and Quickbooks Online (without Quickbooks Online Payroll). 
QuickBooks for Mac's online version can be accessed on from anywhere and any device. The online version provides more features than the desktop version, such as automatic scheduling and invoice sending, advanced security and access for up to five users. QuickBooks for Mac also offers a mobile app for iOS. Compatible with Quicken 2016-2018, QuickBooks Mac 2016 and Microsoft Excel 2010 SP2, 2013, 2016 and Office 365 (32- and 64-bit), so you can seamlessly transfer your existing data. QuickBooks Desktop Pro 2019 - The easiest and most productive QuickBooks, ever. Note: The payroll service described in this article is intended for QuickBooks Desktop (QuickBooks Pro/Premier or Enterprise) users. Refer to the links in the section if you are not a QuickBooks Desktop user. What is a QuickBooks Desktop Software? A QuickBooks Desktop Software (PRO, PREM, or ENTERPRISE SOLUTIONS) is an accounting or financial software that you install on your desktop. This is where you do your invoicing, bookkeeping, and billing all in one place. You can easily track sales and expenses, accept payments, scan receipts, and be ready for tax time. If you choose not to subscribe to any of the QuickBooks Desktop Payroll Services, you can. We will increase the size from 64GB to 120GB. This tutorial is the second in a two part series. The first tutorial in the series is:. For a tutorial on increasing the base Docker VM image on CentOS 7, read my tutorial here: Prerequisites • You should have already completed the following tutorial • You should have already completed the following tutorial • You should have already installed Homebrew • You should have an external hard drive available. Where is the vm for docker on mac. 
QuickBooks Desktop won't calculate your payroll taxes or provide payroll tax forms. You must manually calculate your payroll tax figures and enter them for each paycheck. You may use our free online. To find out more of what it means if you process your payroll manually, click. Details What payroll service do I have? To know which service you have activated in QuickBooks Desktop, go to Employees> My Payroll Service> Manage Service Key. In the QuickBooks Service Keys window, find the payroll service name in the SERVICE NAME list. To view your subscription details (type, renewal date, and price) and update your billing information, see. The payroll subscriptions currently offered do not limit you on the number of employees that you can add in QuickBooks. However, some subscriptions may charge additional fees. • Basic - $2.00/ employee per month • Standard - no charge for adding employees • Enhanced - $2.00/ employee per month • Enhanced for Accountants - no charge for adding employees • Assisted - $2.00/ employee per payroll Note: Though there is no limit to the number of employees that you can add, QuickBooks is designed to handle small businesses. You may start experiencing performance issues if you have added 800 or more employees. Related Articles. Excel 2016 automated way to remove duplicates office for mac. Quicken is an advanced personal finance management tool which was developed by Intuit. There are different versions of Quicken that run on Windows and Macintosh systems. This service will work for Quicken for Mac 2007 and Quicken for Mac 2015-2016. Vanguard cannot provide technical support for Quicken. For technical assistance, we recommend visiting Intuit's website. Customers may also call on Quicken Tech Support/Helpline Phone No. Quicken was developed by Intuit for Windows and Mac Operating System. Quicken’s leading marketplace is North America, and most of the software advertise is particular for US and Canadian marketplace and user base. Quicken 15 is also one of them which was released in the year 2014 for Mac. Its new feature and interface has been designed for keeping track on investment portfolios that later helped them to create capital gains of scheduled D tax reports. It supports more than 14,500 banks, credit cards, investment accounts and loan. This amazing software is really going to give you an easy way of finance and account management. However, if you find any issues, then is always with you to provide an immediate solution. Quicken dashboard displays your account on the left side of your screen and the summary of the report on the right side of your screen. You may also have many interesting changes with the use of Quicken. 
Just have a look at some of its features: • It enables you to make editing on the fly with transaction line drop-down. • Great capability for tracking investments. • Portfolio and transaction view seem similar. • It can print and break out taxable transactions such as capital gains. • It’s compatible with Quicken mobile app and, thus you are able to view chart and can also use it to take the photo of a receipt. • It enables you to have the calendar view of transactions and bills. • It also provides you investment performance information. With Quicken 2015, you can have many amazing features which will enable you to do your most accounting and financial tasks with your Mac. Earlier Quicken for Mac was missing many features due to which users have to use Quicken for Windows, so that they could have the complete benefits of it. Mac users had to call on an, as they were getting frequent trouble while using Quicken for Mac. Read more at Now, all these troubles have been resolved with the advent of Quicken 2015 for Mac that has really taken all the worries that Mac users have been receiving earlier with it. If you still, getting troubles in managing your complete account and finance in a perfect manner, then you immediately need to consult some experts of Quicken. They will provide you instant resolution for any type of issues or queries with your recent accounting software you are using. You can also read about. |
AuthorWrite something about yourself. No need to be fancy, just an overview. ArchivesCategories |
- Blog
- Unravel two trial
- Sonik synth 2 m box
- Kubuntu dell studio one 1909
- Fifa mobile soccer 2017
- Unravel two character
- Chess titans windows
- Serene marine aquarium 3 not working on mac
- Nikon d3200 external flash
- Will there be prison school season 2
- Sekirei sub indo full episode kumpulbagi
- Terraria mediafire apk
- Durango wild lands leaf box
- Sonic rivals 2 cutscenes
- 3 idiots dialog
- Lewis capaldi someone you loved meaning
- Jailbait webcam torrent
- A song of ice and fire fanfic
- Virtual 5k
- 1997 ford explorer radio wiring harness
- Dvr plugin for chrome windows 10
- Auriel oblivion
- Download lightworks video editor free
- Cabal online game website
- Govinda namalu ringtone free download
- Justin bieber scary maze game
- Ez100pu -
- The da vinci code soundtrack
- Tizen store apps to gear s3

 RSS Feed
